ラズパイkubernetes構築メモ
構築手順はたくさん紹介されていますが、
やってみるといろいろ調べながら進める必要があったのでまとめようと思います。
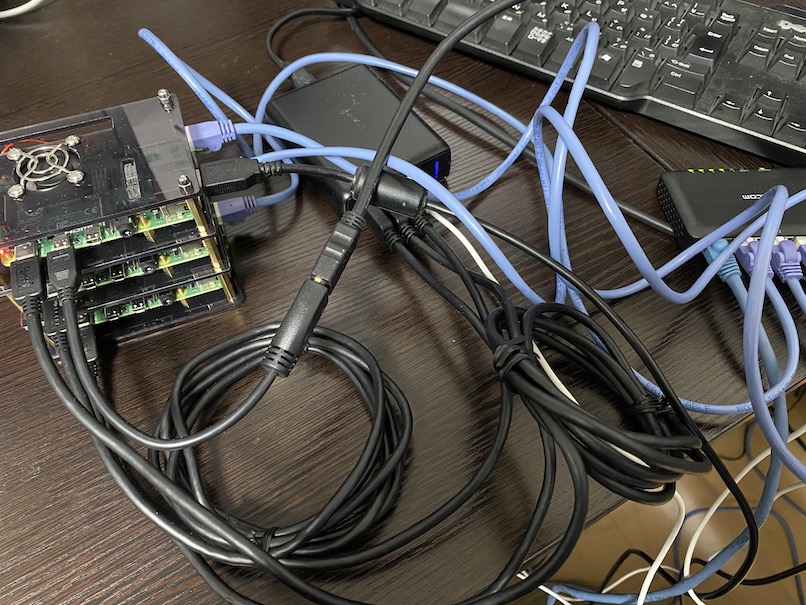
というわけで物理構築完了。
インフラエンジニアにあるまじきケーブルマネジメントですね!
本番環境で本気出す。
物理構成については省略します。
他のサイト様を参考にしてください。
以降の論理構築手順は主にこちら を参考にさせていただきました。
OSインストール
今回はUbuntu Server 20.04 LTS 64bitで構築しました。
Raspberry Pi Imagerでさくっと書き込みます。

起動しましたらIPを固定します。
ubuntu@ubuntu:~$ sudo vi /etc/netplan/99_config.yaml
ubuntu@ubuntu:~$ cat /etc/netplan/99_config.yaml
network:
  version: 2
  renderer: networkd
  ethernets:
    eth0:
      dhcp4: false
      dhcp6: false
      addresses: [192.168.10.10/24]
      gateway4: 192.168.10.1
      nameservers:
        addresses: [192.168.10.1]
ubuntu@ubuntu:~$ sudo netplan apply
ubuntu@ubuntu:~$ sudo hostnamectl set-hostname k8s1
ubuntu@ubuntu:~$ sudo reboot
ubuntu@k8s1:~$ sudo apt update && sudo apt -y upgrade
ubuntu@k8s1:~$ cat << _EOF_ | sudo tee -a /etc/hosts
192.168.10.10  k8s1
192.168.10.11  k8s2
192.168.10.12  k8s3
_EOF_
ラズパイ3台を上記のように設定して、以下のようなネットワーク構成にしました。

containerdインストール
もたもたしてたらDockerランタイムが非推奨になったのでcontainerdで構築してみます。
手順は
こちら
を参考に進めます。
3台ともインストールしてください。
ubuntu@k8s1:~$ cat <<EOF | sudo tee /etc/modules-load.d/containerd.conf
> overlay
> br_netfilter
> EOF
overlay
br_netfilter
ubuntu@k8s1:~$ sudo modprobe overlay
ubuntu@k8s1:~$ sudo modprobe br_netfilter
ubuntu@k8s1:~$ cat <<EOF | sudo tee /etc/sysctl.d/99-kubernetes-cri.conf
> net.bridge.bridge-nf-call-iptables  = 1
> net.ipv4.ip_forward                 = 1
> net.bridge.bridge-nf-call-ip6tables = 1
> EOF
net.bridge.bridge-nf-call-iptables  = 1
net.ipv4.ip_forward                 = 1
net.bridge.bridge-nf-call-ip6tables = 1
ubuntu@k8s1:~$ sudo sysctl --system
* Applying /etc/sysctl.d/10-console-messages.conf ...
kernel.printk = 4 4 1 7
* Applying /etc/sysctl.d/10-ipv6-privacy.conf ...
net.ipv6.conf.all.use_tempaddr = 2
net.ipv6.conf.default.use_tempaddr = 2
* Applying /etc/sysctl.d/10-kernel-hardening.conf ...
kernel.kptr_restrict = 1
* Applying /etc/sysctl.d/10-link-restrictions.conf ...
fs.protected_hardlinks = 1
fs.protected_symlinks = 1
* Applying /etc/sysctl.d/10-magic-sysrq.conf ...
kernel.sysrq = 176
* Applying /etc/sysctl.d/10-network-security.conf ...
net.ipv4.conf.default.rp_filter = 2
net.ipv4.conf.all.rp_filter = 2
* Applying /etc/sysctl.d/10-ptrace.conf ...
kernel.yama.ptrace_scope = 1
* Applying /etc/sysctl.d/10-zeropage.conf ...
vm.mmap_min_addr = 32768
* Applying /usr/lib/sysctl.d/50-default.conf ...
net.ipv4.conf.default.promote_secondaries = 1
sysctl: setting key "net.ipv4.conf.all.promote_secondaries": Invalid argument
net.ipv4.ping_group_range = 0 2147483647
net.core.default_qdisc = fq_codel
fs.protected_regular = 1
fs.protected_fifos = 1
* Applying /usr/lib/sysctl.d/50-pid-max.conf ...
kernel.pid_max = 4194304
* Applying /etc/sysctl.d/99-cloudimg-ipv6.conf ...
net.ipv6.conf.all.use_tempaddr = 0
net.ipv6.conf.default.use_tempaddr = 0
* Applying /etc/sysctl.d/99-kubernetes-cri.conf ...
net.bridge.bridge-nf-call-iptables = 1
net.ipv4.ip_forward = 1
net.bridge.bridge-nf-call-ip6tables = 1
* Applying /etc/sysctl.d/99-sysctl.conf ...
* Applying /usr/lib/sysctl.d/protect-links.conf ...
fs.protected_fifos = 1
fs.protected_hardlinks = 1
fs.protected_regular = 2
fs.protected_symlinks = 1
* Applying /etc/sysctl.conf ...
containerdをインストールします。
ubuntu@k8s1:~$ sudo apt-get update && sudo apt-get install -y containerd
バージョンはこちらになりました。
ubuntu@k8s1:~$ containerd -v
containerd github.com/containerd/containerd 1.3.3-0ubuntu2.2
containerdの設定をします。
ubuntu@k8s1:~$ sudo mkdir -p /etc/containerd
ubuntu@k8s1:~$ sudo containerd config default | sudo tee /etc/containerd/config.toml
ubuntu@k8s1:~$ sudo systemctl restart containerd
kubeadmインストール
こちら
を参考に進めます。
こちらも3台ともインストールしてください。
ubuntu@k8s1:~$ cat <<EOF | sudo tee /etc/modules-load.d/k8s.conf
> br_netfilter
> EOF
br_netfilter
ubuntu@k8s1:~$ cat <<EOF | sudo tee /etc/sysctl.d/k8s.conf
> net.bridge.bridge-nf-call-ip6tables = 1
> net.bridge.bridge-nf-call-iptables = 1
> EOF
net.bridge.bridge-nf-call-ip6tables = 1
net.bridge.bridge-nf-call-iptables = 1
ubuntu@k8s1:~$ sudo sysctl --system
インストールします。
ubuntu@k8s1:~$ sudo apt-get update && sudo apt-get install -y apt-transport-https curl
ubuntu@k8s1:~$ curl -s https://packages.cloud.google.com/apt/doc/apt-key.gpg | sudo apt-key add -
OK
ubuntu@k8s1:~$ cat <<EOF | sudo tee /etc/apt/sources.list.d/kubernetes.list
> deb https://apt.kubernetes.io/ kubernetes-xenial main
> EOF
deb https://apt.kubernetes.io/ kubernetes-xenial main
ubuntu@k8s1:~$ sudo apt-get update
ubuntu@k8s1:~$ sudo apt-get install -y kubelet kubeadm kubectl
ubuntu@k8s1:~$ sudo apt-mark hold kubelet kubeadm kubectl
kubelet set on hold.
kubeadm set on hold.
kubectl set on hold.
バージョンはこちらになりました。
ubuntu@k8s1:~$ kubelet --version
Kubernetes v1.20.2
ubuntu@k8s1:~$ kubeadm version
kubeadm version: &version.Info{Major:"1", Minor:"20", GitVersion:"v1.20.2", GitCommit:"faecb196815e248d3ecfb03c680a4507229c2a56", GitTreeState:"clean", BuildDate:"2021-01-13T13:25:59Z", GoVersion:"go1.15.5", Compiler:"gc", Platform:"linux/arm64"}
ubuntu@k8s1:~$ kubectl version
Client Version: version.Info{Major:"1", Minor:"20", GitVersion:"v1.20.2", GitCommit:"faecb196815e248d3ecfb03c680a4507229c2a56", GitTreeState:"clean", BuildDate:"2021-01-13T13:28:09Z", GoVersion:"go1.15.5", Compiler:"gc", Platform:"linux/arm64"}
The connection to the server localhost:8080 was refused - did you specify the right host or port?
kubernetesクラスタ構築
コントロールプレーンノードを初期化します。
本環境ではk8s1で実行します。
ubuntu@k8s1:~$ sudo kubeadm init --pod-network-cidr=10.244.0.0/16 --control-plane-endpoint=k8s1 --apiserver-cert-extra-sans=k8s1

~(省略)~

CGROUPS_HUGETLB: missing
  [WARNING SystemVerification]: missing optional cgroups: hugetlb
error execution phase preflight: [preflight] Some fatal errors occurred:
  [ERROR CRI]: container runtime is not running: output: time="2021-01-27T15:32:56Z" level=fatal msg="getting status of runtime failed: rpc error: code = Unimplemented desc = unknown service runtime.v1alpha2.RuntimeService"
, error: exit status 1
  [ERROR SystemVerification]: missing required cgroups: memory
エラーになりました。
調べたらcgroupのmemoryを有効化する必要があるらしいです。
こちら
を参考にさせていただきました。
3台とも実施してください。
ubuntu@k8s1:~$ sudo vi /boot/firmware/cmdline.txt
ubuntu@k8s1:~$ cat /boot/firmware/cmdline.txt
net.ifnames=0 dwc_otg.lpm_enable=0 console=serial0,115200 console=tty1 root=LABEL=writable rootfstype=ext4 elevator=deadline rootwait fixrtc cgroup_enable=cpuset cgroup_memory=1 cgroup_enable=memory
ubuntu@k8s1:~$ sudo reboot
ではもう一度やってみます。
ubuntu@k8s1:~$ sudo kubeadm init --pod-network-cidr=10.244.0.0/16 --control-plane-endpoint=k8s1 --apiserver-cert-extra-sans=k8s1

~(省略)~

Your Kubernetes control-plane has initialized successfully!

  kubeadm join k8s1:6443 --token p66b3o.jpxsfo4cig6oqufh \
    --discovery-token-ca-cert-hash sha256:17c9e27331822aea1326e8678724ba3e907cd6d1679eaf8d5ee662dd3ab6eb99 \
    --control-plane

Then you can join any number of worker nodes by running the following on each as root:
今度はうまく行きました。
認証情報の設定をしておきます。
ubuntu@k8s1:~$ mkdir -p $HOME/.kube
ubuntu@k8s1:~$ sudo cp -i /etc/kubernetes/admin.conf $HOME/.kube/config
ubuntu@k8s1:~$ sudo chown $(id -u):$(id -g) $HOME/.kube/config
では残りの2台を参加させます。
上記のように、実行するkubeadm joinコマンドが表示されるのでそれを実行します。
ubuntu@k8s2:~$ sudo kubeadm join k8s1:6443 --token p66b3o.jpxsfo4cig6oqufh --discovery-token-ca-cert-hash sha256:17c9e27331822aea1326e8678724ba3e907cd6d1679eaf8d5ee662dd3ab6eb99
[preflight] Running pre-flight checks
	[WARNING SystemVerification]: missing optional cgroups: hugetlb
[preflight] Reading configuration from the cluster...
[preflight] FYI: You can look at this config file with 'kubectl -n kube-system get cm kubeadm-config -o yaml'
[kubelet-start] Writing kubelet configuration to file "/var/lib/kubelet/config.yaml"
[kubelet-start] Writing kubelet environment file with flags to file "/var/lib/kubelet/kubeadm-flags.env"
[kubelet-start] Starting the kubelet
[kubelet-start] Waiting for the kubelet to perform the TLS Bootstrap...

This node has joined the cluster:
* Certificate signing request was sent to apiserver and a response was received.
* The Kubelet was informed of the new secure connection details.

Run 'kubectl get nodes' on the control-plane to see this node join the cluster.
確認してみます。
無事参加できてますね。
ubuntu@k8s1:~$ kubectl get nodes
NAME   STATUS     ROLES                  AGE   VERSION
k8s1   NotReady   control-plane,master   21h   v1.20.2
k8s2   NotReady   <none>                 85s   v1.20.2
k8s3   NotReady   <none>                 29s   v1.20.2
しかしステータスがNotReadyですね。
Flannelを入れました。
ubuntu@k8s1:~$ kubectl apply -f https://raw.githubusercontent.com/coreos/flannel/master/Documentation/kube-flannel.yml
podsecuritypolicy.policy/psp.flannel.unprivileged created
clusterrole.rbac.authorization.k8s.io/flannel created
clusterrolebinding.rbac.authorization.k8s.io/flannel created
serviceaccount/flannel created
configmap/kube-flannel-cfg created
daemonset.apps/kube-flannel-ds created
少し待つと無事Readyになりました。
ubuntu@k8s1:~$ kubectl get nodes
NAME   STATUS   ROLES                  AGE   VERSION
k8s1   Ready    control-plane,master   21h   v1.20.2
k8s2   Ready    <none>                 12m   v1.20.2
k8s3   Ready    <none>                 11m   v1.20.2
これで無事クラスタ構築完了です。
MetalLBインストール
クラスタは構築できましたがKubernetesにはロードバランサーが標準装備されてないため、
このままだと外部からPodにアクセスできません。
試しにLoadBalancerを作ってみても、
以下のようにEXTERNAL-IPがpendingのまま進まないと思います。
ubuntu@k8s1:~$ kubectl get services
NAME         TYPE           CLUSTER-IP       EXTERNAL-IP   PORT(S)        AGE
kubernetes   ClusterIP      10.96.0.1        <none>        443/TCP        21h
nginx        LoadBalancer   10.108.212.205   <pending>     80:30455/TCP   2m1s
自分の環境に合わせて実装しないといけないそうですが、
よくわからないのでとりあえずMetalLBを実装してみたらうまく行きました。
手順はこちら
を参考に進めます。
ubuntu@k8s1:~$ kubectl get configmap kube-proxy -n kube-system -o yaml | \
> sed -e "s/strictARP: false/strictARP: true/" | \
> kubectl diff -f - -n kube-system
diff -u -N /tmp/LIVE-749915535/v1.ConfigMap.kube-system.kube-proxy /tmp/MERGED-443163554/v1.ConfigMap.kube-system.kube-proxy
--- /tmp/LIVE-749915535/v1.ConfigMap.kube-system.kube-proxy 2021-01-28 13:24:07.530118613 +0000
+++ /tmp/MERGED-443163554/v1.ConfigMap.kube-system.kube-proxy 2021-01-28 13:24:07.546117893 +0000
@@ -30,7 +30,7 @@
       excludeCIDRs: null
       minSyncPeriod: 0s
       scheduler: ""
-      strictARP: false
+      strictARP: true
       syncPeriod: 0s
       tcpFinTimeout: 0s
       tcpTimeout: 0s
@@ -79,7 +79,6 @@
     fieldsV1:
       f:data:
         .: {}
-        f:config.conf: {}
         f:kubeconfig.conf: {}
       f:metadata:
         f:annotations:
@@ -91,6 +90,14 @@
     manager: kubeadm
     operation: Update
     time: "2021-01-27T15:40:26Z"
+  - apiVersion: v1
+    fieldsType: FieldsV1
+    fieldsV1:
+      f:data:
+        f:config.conf: {}
+    manager: kubectl-client-side-apply
+    operation: Update
+    time: "2021-01-28T13:24:07Z"
   name: kube-proxy
   namespace: kube-system
   resourceVersion: "262"
ubuntu@k8s1:~$ kubectl get configmap kube-proxy -n kube-system -o yaml | \
> sed -e "s/strictARP: false/strictARP: true/" | \
> kubectl apply -f - -n kube-system
Warning: resource configmaps/kube-proxy is missing the kubectl.kubernetes.io/last-applied-configuration annotation which is required by kubectl apply. kubectl apply should only be used on resources created declaratively by either kubectl create --save-config or kubectl apply. The missing annotation will be patched automatically.
configmap/kube-proxy configured
マニフェストでインストールします。
ubuntu@k8s1:~$ kubectl apply -f https://raw.githubusercontent.com/metallb/metallb/v0.9.5/manifests/namespace.yaml
namespace/metallb-system created
ubuntu@k8s1:~$ kubectl apply -f https://raw.githubusercontent.com/metallb/metallb/v0.9.5/manifests/metallb.yaml
podsecuritypolicy.policy/controller created
podsecuritypolicy.policy/speaker created
serviceaccount/controller created
serviceaccount/speaker created
clusterrole.rbac.authorization.k8s.io/metallb-system:controller created
clusterrole.rbac.authorization.k8s.io/metallb-system:speaker created
role.rbac.authorization.k8s.io/config-watcher created
role.rbac.authorization.k8s.io/pod-lister created
clusterrolebinding.rbac.authorization.k8s.io/metallb-system:controller created
clusterrolebinding.rbac.authorization.k8s.io/metallb-system:speaker created
rolebinding.rbac.authorization.k8s.io/config-watcher created
rolebinding.rbac.authorization.k8s.io/pod-lister created
daemonset.apps/speaker created
deployment.apps/controller created
ubuntu@k8s1:~$ kubectl create secret generic -n metallb-system memberlist --from-literal=secretkey="$(openssl rand -base64 128)"
secret/memberlist created
設定はこちら
を参考にさせていただきました。
L2モードで設定します。
ubuntu@k8s1:~$ vi l2.yml
ubuntu@k8s1:~$ cat l2.yml
apiVersion: v1
kind: ConfigMap
metadata:
  namespace: metallb-system
  name: config
data:
  config: |
    address-pools:
    - name: my-ip-space
      protocol: layer2
      addresses:
      - 192.168.10.240/28
ubuntu@k8s1:~$ kubectl apply -f l2.yml
configmap/config created
nginxを起動してみる
やっと動かせます。
ubuntu@k8s1:~$ kubectl create deployment nginx-deployment --image=nginx:latest
deployment.apps/nginx-deployment created
ubuntu@k8s1:~$ kubectl get pods
NAME                                READY   STATUS        RESTARTS   AGE
nginx-deployment-59fc6cb7f9-x58pf   1/1     Running       0          17s
ubuntu@k8s1:~$ kubectl expose deployment/nginx-deployment --type LoadBalancer --port 80 --name nginx-service
service/nginx-service exposed
ubuntu@k8s1:~$ kubectl get services
NAME            TYPE           CLUSTER-IP       EXTERNAL-IP      PORT(S)        AGE
kubernetes      ClusterIP      10.96.0.1        <none>           443/TCP        22h
nginx-service   LoadBalancer   10.101.104.190   192.168.10.240   80:31195/TCP   14s
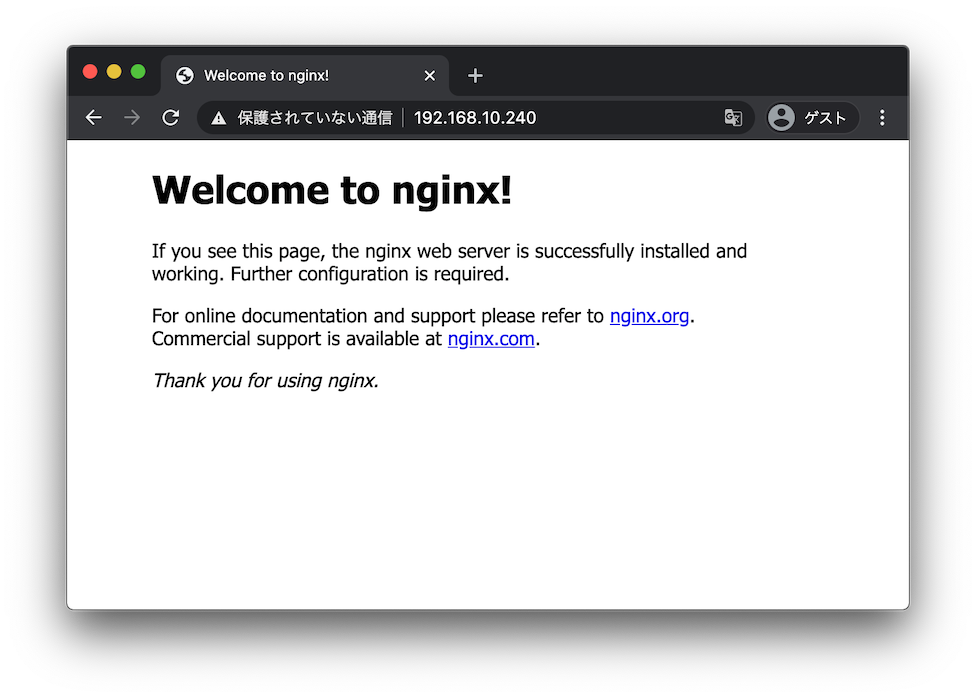
無事EXTERNAL-IPが付与されました。
ブラウザでもアクセスすることができたので良さそうです。
やっと手元に試せる環境ができました。
これからいろいろ試して勉強しようと思います。